
I was working with a client recently who needed to move away from Windows 7. Most of the existing devices could simply be replaced with Windows 11 ones, the software they used was either already packaged for deployment or was packaged for deployment to enable the migration. However some devices had software that couldn’t be repackaged. Often this was bespoke software, so it was impossible to get an updated version and the original developer was long gone.
As leaving the Windows 7 devices on the network was not an option (support for Windows 7 was expiring), I suggested that we should look at moving these devices to Azure. Although this would not remove Windows 7 from the network, it would be much easier to isolate the devices from the rest of the network and only allow required access to resources. It would also help to ensure that users used their new Windows 11 devices for day to day work and only use the Azure device for it’s specific purpose. The initial downside of Azure cost can also be considered an upside because it allows the additional costs to be charged back to the department owning the devices, thereby providing a financial incentive to migrate away from Windows 7.
Step One: Take an image of the volumes
The first thing to do is take an image of the disk or disks that need to be migrated. This is done using a tool called Disk2VHD, which can be downloaded from https://learn.microsoft.com/en-us/sysinternals/downloads/disk2vhd.
As its name suggests, it creates a VHD file from a physical disk.
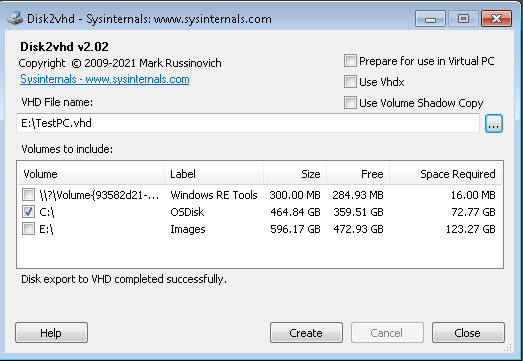
Don’t forget to untick the “Use Vhdx” option otherwise you will need to convert the resulting vhdx image to vhd to be able to perform the next step in the process. I had to add a USB disk to the device so that I had somewhere to create the large vhd file that gets created. The Disk2VHD tool does not seem to support network drives.
I also ensured that RDP was enabled on the device and added a local ID and added it to the local Administrators group so that I would be able to RDP onto the device once it was in Azure.
If additional drives are used on the device, each one can be imaged and then uploaded to a Managed Disk in Azure.
Step 2: Upload VHD into an Azure Managed Disk
Uploading the disk image to Azure is done using Powershell. It needs to be done from a device with Hyper-V enabled as the powershell command uses Hyper-V functionality during the process.
Start by installing the AZ.Compute module
install-module az.compute
Connect to your Azure Tenant
Connect-AzAccount
Create a managed disk in Azure from your vhd file
add-azVHD -LocalFilePath <path to vhd file> -ResourceGroupName <resource group name> -Location <location (e.g. UKSOUTH)> -DiskName <Name for the managed disk>
During the uploading process the command resizes the vhd file by creating a copy of the file, so ensure you have sufficient disk space to allow this to happen.
Step 3: Create the Virtual Machine
The Add-AzVHD command creates a new Managed Disk and uploads the VHD image to it. Once that has completed a VM needs to be created. This is done from within the Managed Disk, so open the Managed disk in the Azure Portal.
Check on the Overview blade that the Disk state is Unattached.
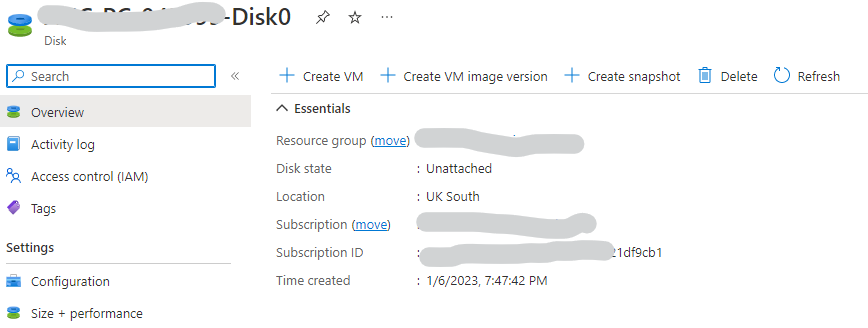
Then select the Create VM option at the top of the page. Fill in all the elements you normally need for a VM and the VM will be created, with the Managed disk attached.