PowerShell: Automatically Deploy an Azure Test or Development Environment as Code (IaC)

We often need to build testing, packaging or development environments in Azure. Often these are built in an ad-hoc way, manually. This is fine, if a little time consuming, but Azure makes it easy to create scripts that will automate the provisioning of these environments. In fact, automation should really be the preferred method of deployment as it ensures that environments can be deployed or re-deployed rapidly whilst maintaining build quality.

The script that I am going to describe here uses PowerShell Azure cmdlets to provide a very flexible method of deploying the Azure environment, and deploying as many fully configured VMs (desktops or servers) as you may need.

This script relies on the AZ PowerShell module, and this should be installed on any workstation prior to running the script by running the following command. The script uses functions, for code minimisation and to simplify code reuse.

Install-Module -Name Az

Azure Environment and Networking

All the variables required for the script are set at the beginning, and I have added comments in the script describing all of these. All output is sent to the console.

The ConfigureNetwork function creates a Virtual Network, a subnet and a Network Security Group (NSG) name. The NSG also has a rule enabled for RDP. You can add other rules if you need them. If you don’t need the networking configured simply comment out the ConfigureNetwork call later in the script.

function ConfigureNetwork {
    $virtualNetwork = New-AzVirtualNetwork -ResourceGroupName $RGName -Location $Location -Name $VNet -AddressPrefix 10.0.0.0/16
    $subnetConfig = Add-AzVirtualNetworkSubnetConfig -Name default -AddressPrefix 10.0.0.0/24 -VirtualNetwork $virtualNetwork
        
    $rule1 = New-AzNetworkSecurityRuleConfig -Name rdp-rule -Description "Allow RDP" -Access Allow -Protocol Tcp -Direction Inbound -Priority 100 -SourceAddressPrefix * -SourcePortRange * -DestinationAddressPrefix * -DestinationPortRange 3389
    $nsg = New-AzNetworkSecurityGroup -ResourceGroupName $RGName -Location $location -Name $NsgName -SecurityRules $rule1
        # $rule1, $rule2 etc
        If ($nsg.ProvisioningState -eq "Succeeded") {Write-Host "Network Security Group created successfully"}Else{Write-Host "*** Unable to create or configure Network Security Group! ***"}
    $Vnsc = Set-AzVirtualNetworkSubnetConfig -Name default -VirtualNetwork $virtualNetwork -AddressPrefix "10.0.1.0/24" -NetworkSecurityGroup $nsg
    $virtualNetwork | Set-AzVirtualNetwork >> null
        If ($virtualNetwork.ProvisioningState -eq "Succeeded") {Write-Host "Virtual Network created and associated with the Network Security Group successfully"}Else{Write-Host "*** Unable to create the Virtual Network, or associate it to the Network Security Group! ***"}
}

I wanted the script to support fully configured VMs, which can be configured using scripts and Azure’s Custom Script Extension functionality. This enables scripts to be run during, or after VM deployment. These scripts need storing somewhere, so I have included a CreateStorageAccount function.

function CreateStorageAccount {
    If ($StorAccRequired -eq $True)
        {
        $storageAccount = New-AzStorageAccount -ResourceGroupName $RGName -AccountName $StorAcc -Location uksouth -SkuName Standard_LRS
        $ctx = $storageAccount.Context
        $Container = New-AzStorageContainer -Name $ContainerName -Context $ctx -Permission Container
        If ($storageAccount.StorageAccountName -eq $StorAcc -and $Container.Name -eq $ContainerName) {Write-Host "Storage Account and container created successfully"}Else{Write-Host "*** Unable to create the Storage Account or container! ***"}    
        #$BlobUpload = Set-AzStorageBlobContent -File $BlobFilePath -Container $ContainerName -Blob $Blob -Context $ctx 
        Get-ChildItem -Path $ContainerScripts -File -Recurse | Set-AzStorageBlobContent -Container "data" -Context $ctx
        }
        Else
        {
            Write-Host "Creation of Storage Account and Storage Container not required"
        }   
}

This function creates a Storage Account and a Container (for holding the scripts). It then copies all files found in the $ContainerScripts variable up to the Container. Again, if this functionality is not required (e.g. you are storing your scripts in GitHub) you can comment out the CreateStorageAccount call later in the script.

Creating the VM/s

To provide the correct details for the image, the available SKUs need to be listed. This is done with the following command (don’t forget to enter the location that you want to use when creating the resource, as availability varies between regions).

Get-AzVMImageSku -Location "uksouth" -PublisherName "MicrosoftWindowsServer" -Offer "WindowsServer"

To identify available Windows 10 SKUs, use this command.

Get-AzVMImageSku -Location "uksouth" -PublisherName "MicrosoftWindowsDesktop" -Offer "Windows-10"

From this data we can put together the image name to be used for the VM. For example, We want to deploy the latest 20h2 Windows 10 image, so we would use the following string for the ImageName parameter.

MicrosoftWindowsDesktop:Windows-10:20h2-ent:latest

The CreateVMp function creates the VM, sets the local Admin User and Password, and creates a Public IP address.

function CreateVMp($VMName) {
    $PublicIpAddressName = $VMName + "-ip"

    $Params = @{
    ResourceGroupName = $RGName
    Name = $VMName
    Size = $VmSize
    Location = $Location
    VirtualNetworkName = $VNet
    SubnetName = "default"
    SecurityGroupName = $NsgName
    PublicIpAddressName = $PublicIpAddressName
    ImageName = $VmImage
    Credential = $VMCred
    }

    $VMCreate = New-AzVm @Params
    If ($VMCreate.ProvisioningState -eq "Succeeded") {Write-Host "Virtual Machine $VMName created successfully"}Else{Write-Host "*** Unable to create Virtual Machine $VMName! ***"}
}

Configuring the VM/s

Configuring VMs is done by means of a script, run on the newly provisioned VM. Obviously, a script allows you to do anything that you want. In my example the script is run from the Storage Account but copies media from a GitHub location and then installs Orca. You can use the same technique to do pretty much anything that you need to.

The script is run using the Custom Script Extension functionality in Azure. The function, RunVMConfig, can be run against any Azure Windows VM, it does not have to have been created using this script.

function RunVMConfig($VMName, $BlobFilePath, $Blob) {

    $Params = @{
    ResourceGroupName = $RGName
    VMName = $VMName
    Location = $Location
    FileUri = $BlobFilePath
    Run = $Blob
    Name = "ConfigureVM"
    }

    $VMConfigure = Set-AzVMCustomScriptExtension @Params
    If ($VMConfigure.IsSuccessStatusCode -eq $True) {Write-Host "Virtual Machine $VMName configured successfully"}Else{Write-Host "*** Unable to configure Virtual Machine $VMName! ***"}
}

The script that will be run is taken from the Storage Account Container, but it will also accept the RAW path to a GitHub repository. You would then not need to create the Storage Account.

Script Main Body

The main body of the script is actually quite short, due to the use of functions. The Resource Group is created, and then the ConfigureNetwork and CreateStorageContainer functions are called (if required, they can be commented out).

# Main Script

# Create Resource Group
$RG = New-AzResourceGroup -Name $RGName -Location $Location
If ($RG.ResourceGroupName -eq $RGName) {Write-Host "Resource Group created successfully"}Else{Write-Host "*** Unable to create Resource Group! ***"}

# Create VNet, NSG and rules (Comment out if not required)
ConfigureNetwork

# Create Storage Account and copy media (Comment out if not required)
CreateStorageAccount

# Build VM/s
$Count = 1
While ($Count -le $NumberOfVMs)
    {
    Write-Host "Creating and configuring $Count of $NumberofVMs VMs"
    $VM = $VmNamePrefix + $VmNumberStart
    CreateVMp "$VM"
    RunVMConfig "$VM" "https://packagingstoracc.blob.core.windows.net/data/VMConfig.ps1" "VMConfig.ps1"
    # Shutdown VM if $VmShutdown is true
    If ($VmShutdown)
        {
        $Stopvm = Stop-AzVM -ResourceGroupName $RGName -Name $VM -Force
        If ($RG.ResourceGroupName -eq $RGName) {Write-Host "VM $VM shutdown successfully"}Else{Write-Host "*** Unable to shutdown VM $VM! ***"}
        }
    $Count++
    $VmNumberStart++
    }

In order to provision multiple VMs, a While loop is used, to rerun code until the required number of VMs are provisioned. The VM name is created by concatenating variables, and the name is passed, first to the CreateVMp function, and then to the RunVMConfig function. A variable at the beginning of the script is used to check if the newly provisioned VM should be shutdown or not. This is very useful as an aid to manage costs.

The full script is located here.

https://raw.githubusercontent.com/HigginsonConsultancy/Scripts/master/CreateConfigureVMs.ps1

The VM config script I used is written to output into the Windows Event Log for ease of fault finding. It is located here.

https://raw.githubusercontent.com/HigginsonConsultancy/Scripts/master/VMConfig.ps1

The script outputs to the console and successful completion shouls look something like this.

Resource Group created successfully
Network Security Group created successfully
Virtual Network created and associated with the Network Security Group successfully
Storage Account and container created successfully
Account              SubscriptionName          TenantId                             Environment
-------              ----------------          --------                             -----------
graham@*********.*** Microsoft Partner Network ********-****-****-****-********73ab AzureCloud 

ICloudBlob                         : Microsoft.Azure.Storage.Blob.CloudBlockBlob
BlobType                           : BlockBlob
Length                             : 2034
IsDeleted                          : False
BlobClient                         : Azure.Storage.Blobs.BlobClient
BlobProperties                     : Azure.Storage.Blobs.Models.BlobProperties
RemainingDaysBeforePermanentDelete : 
ContentType                        : application/octet-stream
LastModified                       : 11/30/2020 10:03:49 AM +00:00
SnapshotTime                       : 
ContinuationToken                  : 
Context                            : Microsoft.WindowsAzure.Commands.Storage.AzureStorageContext
Name                               : VMConfig.ps1

Creating and configuring 1 of 1 VMs
Virtual Machine PVMMSI500 created successfully
Virtual Machine PVMMSI500 configured successfully
VM PVMMSI500 shutdown successfully
Phased Deployment of Azure Conditional Access Multi-factor Authentication (MFA) using PowerShell

I recently had a client that needed to deploy Azure MFA, controlled by a conditional access policy, to around 30,000 users. Now, obviously, from a technical point of view this is quite straightforward, however because of the large number of users, and the fact that user communications and support needed to be managed, I wanted this to be done in a controlled way. I didn’t want to overload the helpdesk, or cause business problems for the users, due to unexpected issues.

I therefore wrote 3 scripts that would allow us to easily manage the deployment and ensure that things progressed in a tightly controlled way.

The process that was to be followed was this.

  1. Create the Conditional Access policy and assign to an MFA Deployment group.
  2. Identify all the affected users and gather their User Principal Names into multiple batches. Create files with, perhaps 500 users in each file. This ensures that users are enabled for MFA in small, manageable batches.
  3. Communications are sent to the user to tell them to register their additional authentication methods, together with the URL to the correct web page (aka.ms/MFASetup *). The users will automatically be prompted to register additional authentication methods when they first login, once they are enabled for MFA, however many users tend to ignore this if they can, so its better to try and get them to register before they need to. This saves issues building up with the helpdesk if they encounter problems after waiting until the last minute to register additional authentication methods.
  4. Run the CheckVerificationStatus.ps1 script. This script reads the UPNs from the Input File and lists each UPN together with a list of their registered Strong Authentication Methods. If nothing is listed for a user then they have not registered additional authentication methods for MFA. Communications could then be sent to those users to request that they register.
  5. Run the EnableMFA.ps1 script that takes the UPN names from a file, ensures that sufficient EMS licenses exist, provisions the user with an EMS license, then adds the user to the MFA deployment group.
  6. If irresolvable problems occur, run the DisableMFA.ps1 script which will back-out MFA for all users in the batch, or create a list of users to be backed out and run DisableMFA using that file.

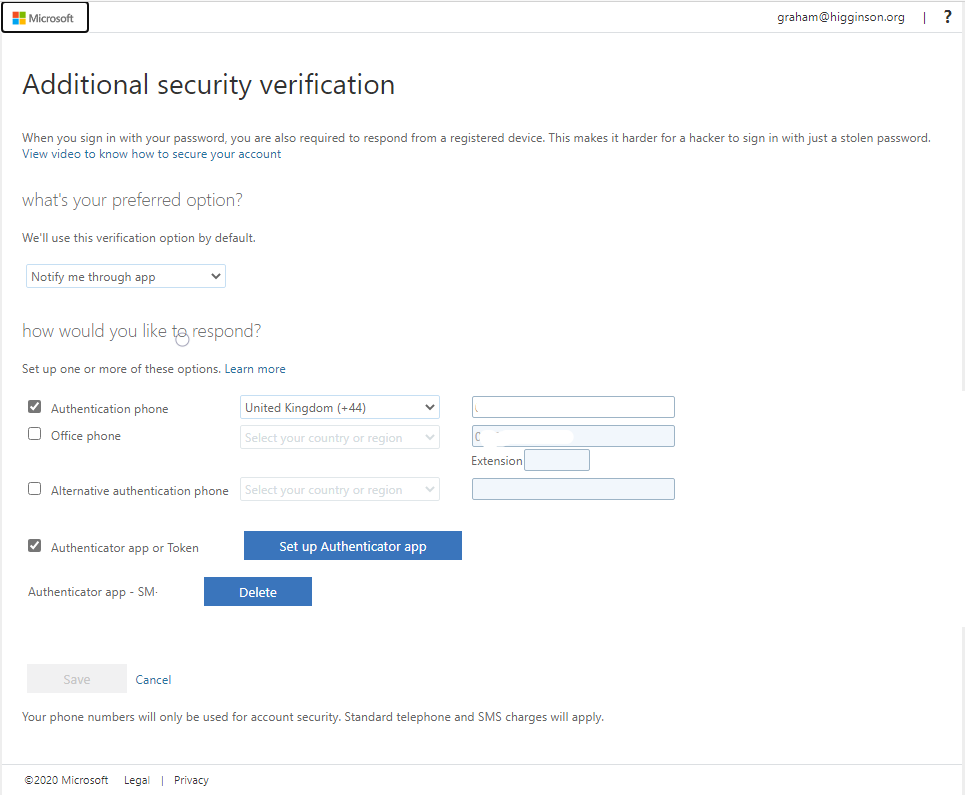
* The aka.ms/MFASetup URL will send each user to the Additional Security Verification page for their own ID. If they haven’t registered additional security verification previously they will be prompted to configure it. If they have configured additional security verification previously they will be shown the page below.

The input files that provide the UPN list are simply TXT files that list each UPN on it’s own line. Try to ensure that there are no blank lines at the end of the file, otherwise you will see the following error in the PowerShell console for each blank line. It doesn’t affect how the scripts work though. The output file is simply a log of what the script has done.

Get-MsolUser : Cannot bind argument to parameter 'UserPrincipalName' because it is an empty string.
At line:10 char:52
+     $CurrentUser = Get-MsolUser -UserPrincipalName $UPN
+                                                    ~~~~
 
    + CategoryInfo          : InvalidData: (:) [Get-MsolUser], ParameterBindingValidationException
    + FullyQualifiedErrorId : ParameterArgumentValidationErrorEmptyStringNotAllowed,Microsoft.Online.Administration.Automation.GetUser

CheckVerificationStatus.ps1

Import-Module -Name Msonline
Connect-MsolService

$InputFile = "C:\Data\UpnList.txt" # List of UPNs
$OutputFile = "C:\Data\Output.txt"
 # Output file

# Read in list of users who will be enabled for MFA
$UPNs = Get-Content -Path $InputFile

ForEach ($UPN in $UPNs)
    {
    $CurrentUser = Get-MsolUser -UserPrincipalName $UPN
      
    If ($CurrentUser.StrongAuthenticationmethods -eq "")
        {
        $NewLine = $UPN + "`t" + "nul" >> $OutputFile
        }
    Else
        {
        $NewLine = $UPN + "`t" + $CurrentUser.StrongAuthenticationmethods.MethodType >> $OutputFile
        }
    }

After prompting for Azure credentials this script takes input from the $InputFile and outputs tab separated data to the $OutputFile. This file can be easily opened in Excel for data manipulation. An example of the output is shown below, showing the Strong Authentication Methods registered for each user. Users with no methods listed have not registered any additional security methods

graham.higginson@xxxxxx.com	OneWaySMS TwoWayVoiceMobile
joe.bloggs@xxxxxx.com	PhoneAppOTP PhoneAppNotification OneWaySMS TwoWayVoiceMobile
jim.booth@xxxxxx.com	
scott.devlin@xxxxxx.com	
andy.knowles@xxxxxx.com	
simon.jay@xxxxxx.com	
john.bonham@xxxxxx.com	

EnableMFA.ps1

Import-Module -Name MsolService
Connect-MsolService

$InputFile = "C:\Data\UpnList.txt"
 # List of UPNs
$OutputFile = "C:\Data\Output.txt"
 # Output File
$License = "xxxxx:EMS"
 # Name of license
$GroupID = "4adcacb1-xxxx-xxxx-xxxx-xxxxxxxxxxxx"
 # GUID of the MFA Deployment group


# Read in list of users who will be enabled for MFA
$UPNs = Get-Content -Path $InputFile


# Identify how many available EMS licenses exist
$Licenses = Get-AzureADSubscribedSku | where {$_.SkuPartNumber -eq 'EMS'}
$PrepaidLicenses = $Licenses.PrePaidUnits.Enabled
$ConsumedLicenses = $Licenses.ConsumedUnits
$AvailableLicenses = $PrepaidLicenses - $ConsumedLicenses

If ($UPNs.count -lt $AvailableLicenses)
    {
     Write-Warning "Sufficient licenses are available"
     Write-Warning "Script continuing..."
    }
Else
    {
     Write-Warning "Insufficient licenses are available"
     Write-Warning "Script stopping!!"
     Break
    }

# Add EMS license to user and add to MFA group
ForEach ($UPN in $UPNs)
    {
    $CurrentUser = Get-MsolUser -UserPrincipalName $UPN
    If ($CurrentUser.Licenses.AccountSkuId -Contains $License)
        {
        Write-Host $UPN "already has an EMS license assigned" >>$OutputFile
        }
    Else
        {
        Set-MsolUserLicense -UserPrincipalName $UPN -AddLicenses $License
        If ($Error[0])
            {
            Write-Host "Unable to add license to" $UPN >>$OutputFile
            $Error.Clear
            }
        Else
            {
            Write-Host "Successfully added license to" $UPN >>$OutputFile
            }
        }

    Add-MsolGroupMember -GroupObjectId $GroupID -GroupMemberType User -GroupMemberObjectId $CurrentUser.ObjectId
    If ($Error[0])
        {
        Write-Host "Unable to add" $UPN "to the MFA group" >>$OutputFile
        $Error.Clear
        }
        Else
            {
            Write-Host "Successfully added" $UPN "to MFA group" >>$OutputFile
            }
    }

After prompting for Azure credentials this script reads in the list of user UPNs and checks that enough licenses are available for the number of users to be enabled for MFA. If there aren’t enough licenses the script will exit. Otherwise the script will assign and EMS license to each user, unless they already have a license assigned. The script then adds each user to the specified MFA Deployment group.

DisableMFA.ps1

Import-Module -Name MsolService
Connect-MsolService


$InputFile = "C:\Data\UpnList.txt"
 # List of UPNs
$OutputFile = "C:\Data\Output.txt"
 # Output File
 
$License = "xxxxx:EMS"
 # Name of license
$GroupID = "4adcacb1-xxxx-xxxx-xxxx-xxxxxxxxxxxx"
 # GUID of the MFA Deployment group

# Read in list of users who will be enabled for MFA
$UPNs = Get-Content -Path $InputFile


ForEach ($UPN in $UPNs)
    {
    $CurrentUser = Get-MsolUser -UserPrincipalName $UPN
    Remove-MsolGroupMember -GroupObjectId $GroupID -GroupMemberType User -GroupMemberObjectId $CurrentUser.ObjectId
    If ($Error[0])
        {
        Write-Host "Unable to remove " $UPN " from MFA group" >>$OutputFile
        $Error.Clear
        }
    Else
        {
        Write-Host "Successfully removed " $UPN " from MFA group" >>$OutputFile
        }
    
    Set-MsolUserLicense -UserPrincipalName $UPN -RemoveLicenses $License
    
    If ($Error[0])
        {
        Write-Host "Unable to remove license from " $UPN >>$OutputFile
        $Error.Clear
        }
    Else
        {
        Write-Host "Successfully removed license from " $UPN >>$OutputFile
        }
    $NewLine = $UPN + "`t" + "Removed from Group" >> $OutputFile
    }

After prompting for Azure credentials this script reads in the list of UPNs and then attempts to remove the user from the MFA Deployment group. It then attempts to remove the EMS license from the user.

*** You may want to comment out the license removal if many of your users already have EMS licenses assigned prior to rolling out MFA. ***

This solution was designed for a very particular use case, and may not be a perfect fit for every requirement, but I hope it provides food for thought. Feel free to take the bits that work for you, to produce your own solution.

Powershell GUI utility to create Intunewin files for Win32 Intune applications

Although Intune is often used to manage mobile devices and applications, it can also manage and deploy Windows 10 applications. It can easily deploy AppX and MSIX applications, but Win32 applications need to be wrapped into an Intunewin package before they can be deployed. This makes them look more like the AppX/MSIX style applications that Intune was originally designed to deploy.

There is a command line tool called the Microsoft Win32 Content Prep Tool that can be used to wrap a Win32 application into an Intunewin format. This work is often be done by application packagers, or by the Intune deployment team.

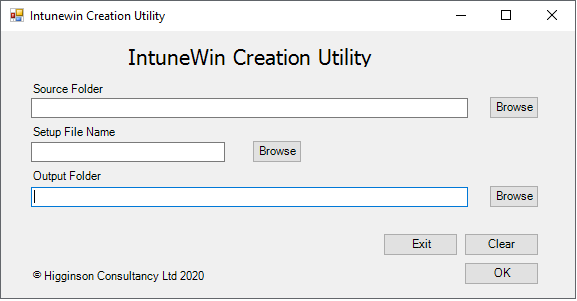
To make use of this tool more convenient to use, and also more suitable for less technical personnel, I have created a GUI application, written in Powershell. The utility comes as an MSI installer, that includes the Powershell script, the content prep tool executable and a shortcut.

The utility can be downloaded below.

https://github.com/HigginsonConsultancy/Media/blob/master/IntuneWinUtility.msi

Once installed, the utility can be started by running the following shortcut.

and when opened, the utility looks like this.

From this window the source folder, output folder and setup file name can be selected, using the browse buttons. Input is validated to ensure that it exists.

The Microsoft Win32 Content Prep Tool has a known bug that causes the tool to fail if output is redirected, therefore I have allowed the CMD window output to be displayed so that it is possible to check that the conversion is working correctly, rather than giving no output at all. The CMD windows closes automatically once the content prep tool has finished, and the Intunewin package will be found in the Output Folder path.