Powershell GUI utility to create Intunewin files for Win32 Intune applications

Although Intune is often used to manage mobile devices and applications, it can also manage and deploy Windows 10 applications. It can easily deploy AppX and MSIX applications, but Win32 applications need to be wrapped into an Intunewin package before they can be deployed. This makes them look more like the AppX/MSIX style applications that Intune was originally designed to deploy.

There is a command line tool called the Microsoft Win32 Content Prep Tool that can be used to wrap a Win32 application into an Intunewin format. This work is often be done by application packagers, or by the Intune deployment team.

To make use of this tool more convenient to use, and also more suitable for less technical personnel, I have created a GUI application, written in Powershell. The utility comes as an MSI installer, that includes the Powershell script, the content prep tool executable and a shortcut.

The utility can be downloaded below.

https://github.com/HigginsonConsultancy/Media/blob/master/IntuneWinUtility.msi

Once installed, the utility can be started by running the following shortcut.

and when opened, the utility looks like this.

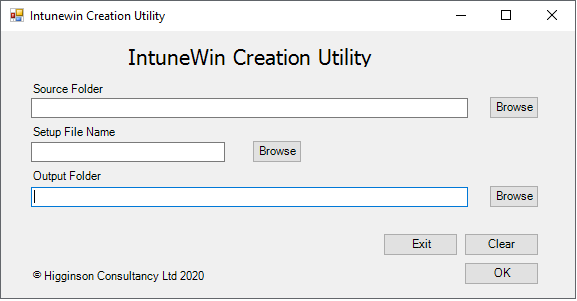
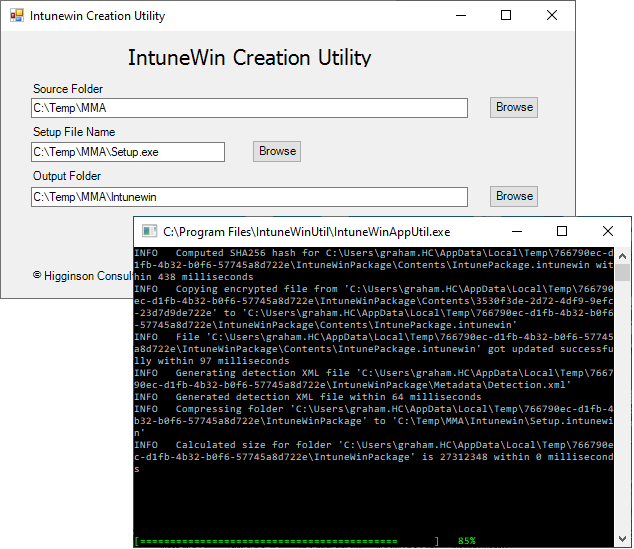
From this window the source folder, output folder and setup file name can be selected, using the browse buttons. Input is validated to ensure that it exists.

The Microsoft Win32 Content Prep Tool has a known bug that causes the tool to fail if output is redirected, therefore I have allowed the CMD window output to be displayed so that it is possible to check that the conversion is working correctly, rather than giving no output at all. The CMD windows closes automatically once the content prep tool has finished, and the Intunewin package will be found in the Output Folder path.

Logging to the Windows Eventlog using Powershell

When automating tasks, such as software installation, using Powershell, it is useful to output to a logfile for fault finding purposes, but I have never liked the idea of creating log files, as these are not easily managed and can build up over time. Another problem is that no-one, other than yourself, is likely to know that the logs exist, or where it is located. Everyone, however, knows about the Windows Eventlog and how to access it, so it makes sense to log your information there.

Adding script output to the Windows Eventlog is reasonably straightforward, but has to be done in the correct way. To use the Eventlog you need to create two items, a new Eventlog and a Source for the log entries. Optionally you can then configure the log that you have created. The code for this is below.

New-EventLog -LogName Application -Source "Documentum_Webtop-AddIn_1.0_x86_R01"
Limit-EventLog -OverflowAction OverWriteAsNeeded -MaximumSize 64KB -LogName Application

The first line of code creates a log called Application, with a source called Documentum_Webtop-AddIn_1.0_x86_R01. The source is simply the packaged application that I am going to be installing. Using this name makes it easy to identify log entries from the application within the Eventlog.

The second line of code sets the maximum size of the log to 64Kb and configures the log to overwrite when it gets to the maximum size.

I can now write to the Eventlog by using the following command.

Write-EventLog -LogName "Application" -Source "Documentum_Webtop-AddIn_1.0_x86_R01" -EventID 25001  -EntryType Information -Message "Begining install of Application Documentum_Webtop-AddIn_1.0_x86_R01"

The EventID should be 25000 or greater, as this range is undocumented.

ErrorType can be Information, Warning or Error.

When writing install and uninstall scripts, I like to include the New-Eventlog and Limit-EventLog entries at the beginning of the Install script, and then remove the Source at the end of the Uninstall script. This keeps things tidy, especially if you have a large number of applications to install.

To remove the source use the following command.

Remove-EventLog -Source "Documentum_Webtop-AddIn_1.0_x86_R01"